
- Home
- Getting Started
- Documentation
- Release Notes
- Tour the Interface
- Tour the Layers
- JMARS Video Tutorials
- Lat/Lon Grid Layer
- Map Scalebar
- Nomenclature
- Crater Counting
- 3D
- Shape Layer
- Mosaics
- Map
- Advanced/Custom Maps
- Graphic/Numeric Maps
- Custom Map Sharing
- Stamp
- THEMIS
- MOC
- Viking
- CRISM Stamp Layer
- CTX
- HiRise
- HiRISE Anaglyph
- HiRISE DTM
- HRSC
- OMEGA
- Region of Interest
- TES
- THEMIS Planning
- Investigate Layer
- Landing Site Layer
- Tutorials
- Video Tutorials
- Displaying the Main View in 3D
- Finding THEMIS Observation Opportunities
- Submitting a THEMIS Region of Interest
- Loading a Custom Map
- Viewing TES Data in JMARS
- Using the Shape Layer
- Shape Layer: Intersect, Merge, and Subtract polygons from each other
- Shape Layer: Ellipse Drawing
- Shape Layer: Selecting a non-default column for circle-radius
- Shape Layer: Selecting a non-default column for fill-color
- Shape Layer: Add a Map Sampling Column
- Shape Layer: Adding a new color column based on the values of a radius column
- Shape Layer: Using Expressions
- Using JMARS for MSIP
- Introduction to SHARAD Radargrams
- Creating Numeric Maps
- Proxy/Firewall
- JMARS Shortcut Keys
- JMARS Data Submission
- FAQ
- Open Source
- References
- Social Media
- Podcasts/Demos
- Download JMARS
Using the Shape Layer
The purpose of this tutorial is to walk users through the process of opening JMARS, navigating to the MER-A (Spirit) landing site at Gusev Crater, opening the Shape Layer, creating Features (points, polylines and polygons), editing the parameters of the Features and modifying the Features using Shape Layer scripts.
Step 1: Opening JMARS, Navigating to Gusev Crater and Opening the Shape Layer
- Double-click the JMARS icon on your desktop to open JMARS.
- Enter your JMARS user name and password. If you do not have a user name and password, follow the instruction under the appropriate "Getting Started" link on the Main Page.
- At this point, the Layer Manager should only have the MOLA Shaded Relief Layer and the Lat/Lon Layer loaded.
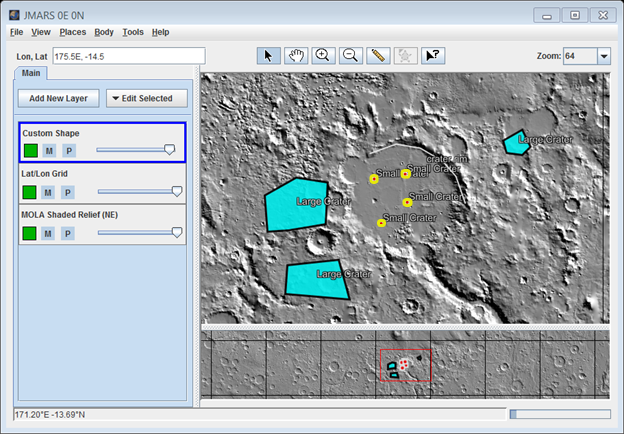
- In the Lon/Lat box in the upper-left corner of the Viewing Window, enter the coordinates "175.5E, -14.5"
- The Main View should now be centered over Gusev Crater.
- In the Layer Manager, click "Add New Layer" -> "Custom Shape Layer", then double-click on the "Custom Shape" layer in the layer manager to access the focus panel.

Step 2: Creating a Shape File
- In "Files" section of the Shape Layer focus panel, highlight the "(untitled)" row.
- In the Main View, right-click and select "Add Points/Lines/Polygons".
- Place point features on some of the small craters within Gusev Crater by double-clicking on them.
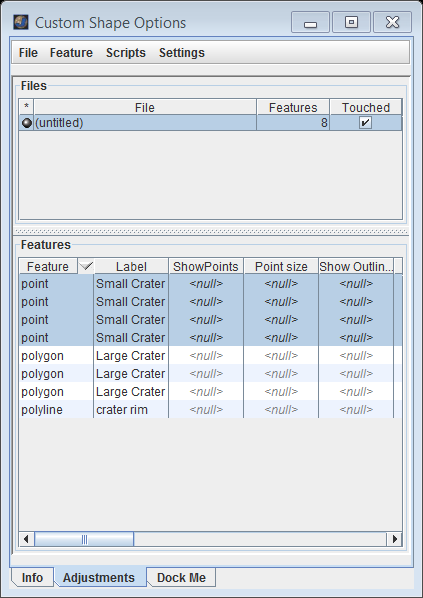
- As the points are added, new rows will appear in the "Features" section of the focus panel.

- Place a polyline along the prominent north-east rim of Gusev Crater. Single-clicks will place points between which lines will be drawn. Double-click on the last point to complete the polyline.
- If the polyline is not selected, the default line thickness and color may make it difficult to see.
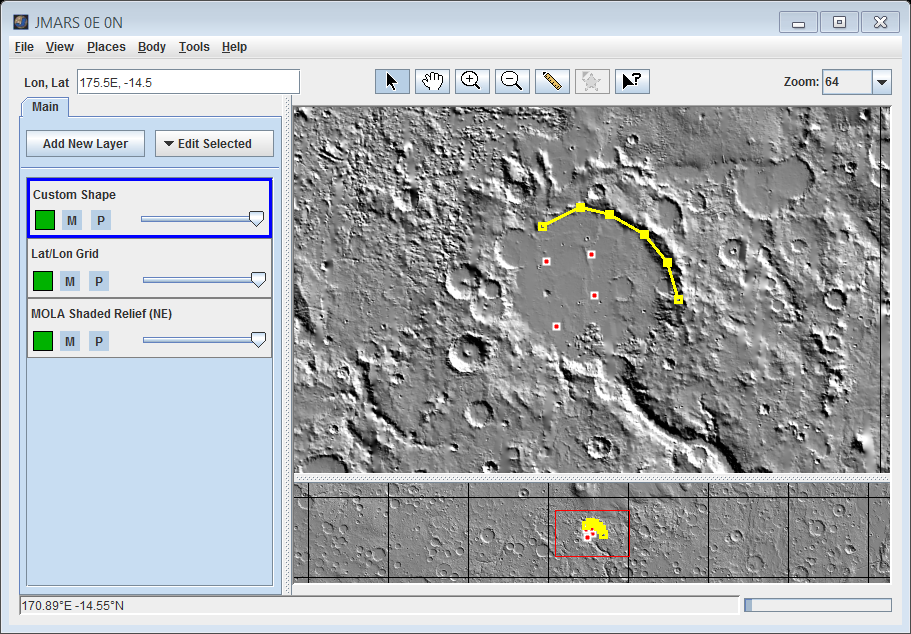
- Place polygons around some of the larger craters outside Gusev Crater. Single-clicks will place the corner points of the polygons, between which lines will be drawn. Close the polygon by adding a point on top of the first point.
- Polygons must be closed shapes. If they are not closed they will register as polylines.
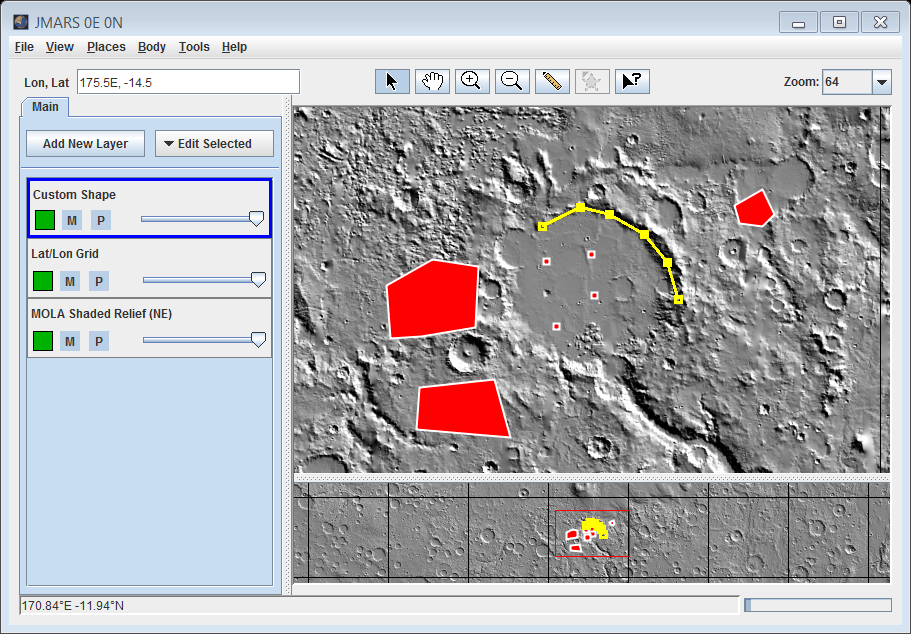
- In the "Features" section of the focus panel, specify labels for each of the features:
- Highlight the five "point" rows, right-click in the "Label" column, select "Edit Column of Selected Rows", type "small crater" in the pop-up window and click "Ok".
- Double-click on the "Label" cell in the "polyline" row and manually type "crater rim" in the description.
- Highlight the three "polygon" rows, right-click in the "Label" column, select "Edit Column of Selected Rows", type "large crater" in the pop-up window and click "Ok".
- Save the features to a file by clicking on "Features" -> "Save All Features As". Specify a path, file name and a shape file type, then click "Save".
- For many applications, a GML file is the easiest to deal with. However, you can also save the features as an ASCII File, ESRI Shape File or an MRO ROI File.
- At this point, the Shape Layer focus panel should look like the example below.

Step 3: Loading a Shape File
- At the top of the Shape Layer focus panel, click on "File" -> "Load File", select a shape file and click "Load".
- In the "Files" section of the focus panel, click on the name of the shape file you just loaded. This will display the features in the shape file in the "Features" section of the focus panel.
Step 4: Editing and Re-Saving a Shape File
- Load a shape file using the procedure above.
- To edit an existing feature, right click on the feature in the Main View and select "Select Features". Placing the mouse cursor over a point (either a stand-alone point or a corner of a polyline or polygon).This will highlight the feature. Left-click and drag points to edit the shape of a feature.
- To move an existing feature, click on it in the Main View and then left-click and drag it to a new position.
- To save the changes, select "Features" -> "Save All Features As" and overwrite the old file.
Step 5: Modifying the Features Using Shape Layer Scripts
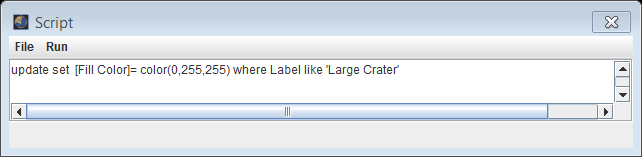
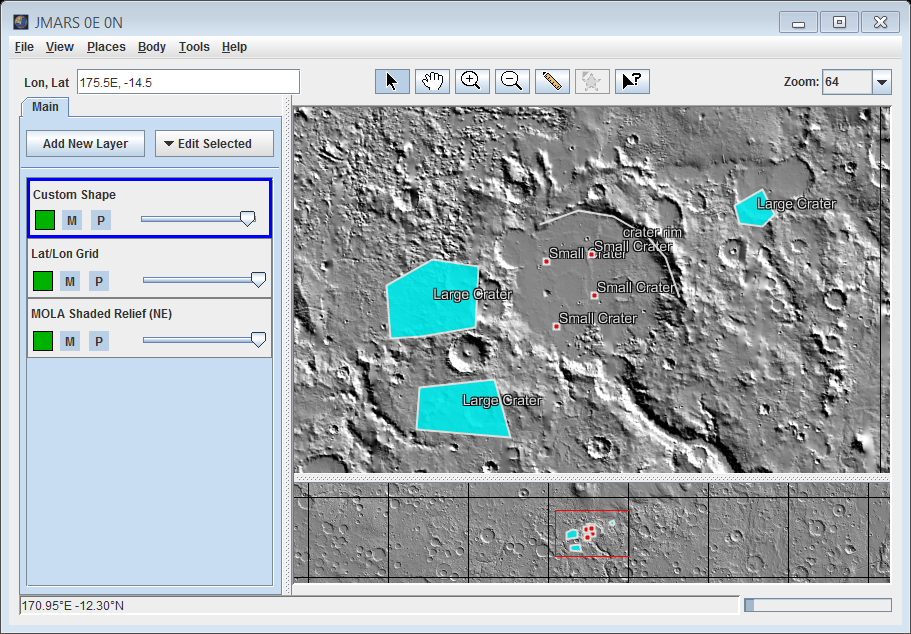
- First, we will use a script to change the fill color of the large crater polygons.
- In the focus panel, select "Scripts" -> "Edit Script". This will open a pop-up window for typing the scripts.
- Type the following command:
update set [Fill Color]= color(0,255,255) where Label like 'large crater'
- In the pop-up script window, select "Run" -> "Run"
- The Main View should then look like the example below:
- Second, we will use a script to simultaneously change the outline color and outline thickness of the large crater polygons.
- In the focus panel, select "Scripts" -> "Edit Script". This will open a pop-up window for typing the scripts.
- Type the following command:
update set [Line Color]= color(0,0,0) where Label like 'large crater'
update set [Line Width]= 3 where Label like 'large crater'
- In the pop-up script window, select "Run" -> "Run"
- The Main View should then look like the example below:


- Third, we will use a script to shift the position of multiple features.
- At the top of the Shape Layer focus panel, select "Feature" -> "Edit Columns", select "string" from the column-type menu, type "lat" in the column name field and click "Ok".
- In the "Features" section of the focus panel, enter the center latitude of each feature.
- In the focus panel, select "Scripts" -> "Edit Script". This will open a pop-up window for typing the scripts.
- Type the following command:
move rows (0.0, -0.5) where lat < -15
- In the pop-up script window, select "Run" -> "Run"
- The the bottom-right polygon (the only feature with a center latitude less than -15, was shifted -0.5 deg in latitude and 0 degrees in longitude. The Main View should now look like the example below:

- Fourth, we will use a script to select features that meet specific criteria.
- In the focus panel, select "Scripts" -> "Edit Script". This will open a pop-up window for typing the scripts.
- Type the following command:
select rows where Label="small crater"
- In the pop-up script window, select "Run" -> "Run"
- All of the points with the label "small crater" will be selected. In the Main View, they will appear with yellow outlines. In the focus panel, their rows will appear highlighted. Examples of both can be seen below:
Congratulations! You have finished the seventh JMARS tutorial!
PREVIOUS: Viewing TES Data in JMARS NEXT: Polygon Functions