- Home
- Getting Started
- Documentation
- Release Notes
- Tour the Interface
- Tour the Layers
- JMARS Video Tutorials
- Lat/Lon Grid Layer
- Map Scalebar
- Nomenclature
- Crater Counting
- 3D
- Shape Layer
- Mosaics
- Map
- Advanced/Custom Maps
- Graphic/Numeric Maps
- Custom Map Sharing
- Stamp
- THEMIS
- MOC
- Viking
- CRISM Stamp Layer
- CTX
- HiRise
- HiRISE Anaglyph
- HiRISE DTM
- HRSC
- OMEGA
- Region of Interest
- TES
- THEMIS Planning
- Investigate Layer
- Landing Site Layer
- Tutorials
- Video Tutorials
- Displaying the Main View in 3D
- Finding THEMIS Observation Opportunities
- Submitting a THEMIS Region of Interest
- Loading a Custom Map
- Viewing TES Data in JMARS
- Using the Shape Layer
- Shape Layer: Intersect, Merge, and Subtract polygons from each other
- Shape Layer: Ellipse Drawing
- Shape Layer: Selecting a non-default column for circle-radius
- Shape Layer: Selecting a non-default column for fill-color
- Shape Layer: Add a Map Sampling Column
- Shape Layer: Adding a new color column based on the values of a radius column
- Shape Layer: Using Expressions
- Using JMARS for MSIP
- Introduction to SHARAD Radargrams
- Creating Numeric Maps
- Proxy/Firewall
- JMARS Shortcut Keys
- JMARS Data Submission
- FAQ
- Open Source
- References
- Social Media
- Podcasts/Demos
- Download JMARS
JMARS ›
Finding THEMIS Observation Opportunities
The purpose of this tutorial is to walk users through the process of opening JMARS, navigating to Ceraunius Tholus using the Nomenclature Layer, using the Stamp Layer to find gaps in 18m VIS coverage of the summit, loading the Groundtrack Layer and identifying opportunities for taking observations to fill these coverage gaps. The JMARS Public Release will be used for this tutorial, although the THEMIS Team Release is very similar and team members should be able to follow along.
Step 1: Opening JMARS
- Click on the JMARS icon on your desktop.
- Enter your JMARS user name and password. If you do not have a user name and password, follow the instruction under the appropriate "Getting Started" link on the Main Page.
- At this point, the Layer Manager should only have the MOLA Shaded Relief Layer and the Lat/Lon Layer loaded.
Step 2: Navigating to Ceraunius Tholus Using the Nomenclature Layer
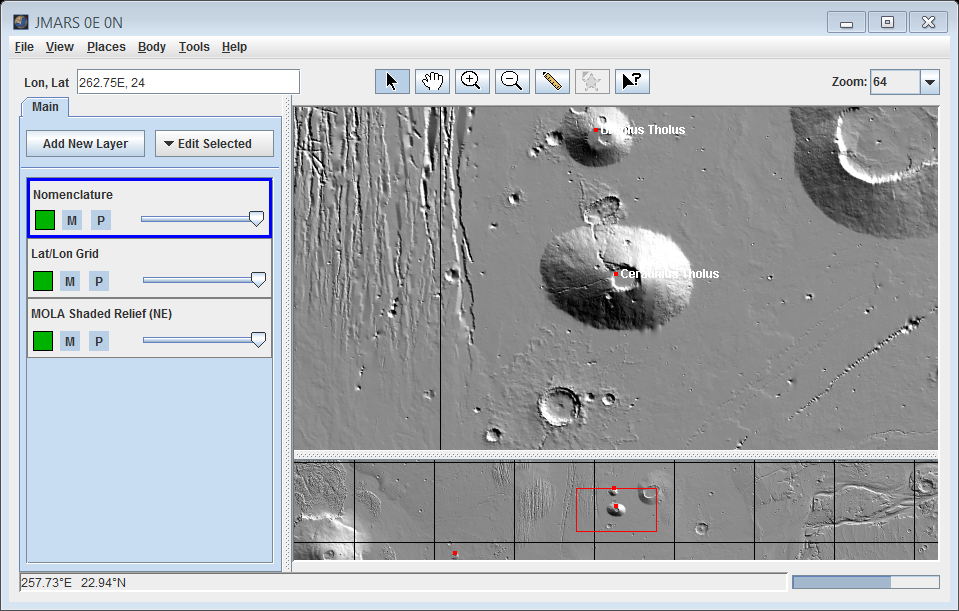
- In the Layer Manager, click "Add New Layer" -> "Nomenclature". Then click on the "Nomenclature" tab to see the layer's focus panel.
- In the "Selected Landmarks" section, select "Tholus"
- In the "Navigation" section, "Tholus" should be listed under "Landmark Type". Locate and select "Ceraunius Tholus" in the "Landmark" drop-down box. Then click "Goto". The Viewing Window will recenter on Ceraunius Tholus.

Step 3: Check VIS Coverage By Loading the Stamp Layer
- In the Viewing Window, place your cursor to the south (downward) of the Ceraunius Tholus summit and read the latitude of the cursor position in the information box at the bottom-left of the Viewing Window.
- In this case, a good approximate value will be 22.0 N.
- In the Viewing Window, place your cursor to the north (upward) of the Ceraunius Tholus summit and read the latitude of the cursor position at the bottom-left or the Viewing Window.
- In this case, a good approximate value will be 27.0 N.
- In the Layer Manager, click "Add New Layer" -> "Imagery" -> "THEMIS"
- In the "Image Type" drop-down box, chose "VIS"
- In the "Min Latitude" field, type "22.0"
- In the "Max Latitude" field, type "27.0"
- In the "Summing" field, type "1" in both the min and max boxes, so JMARS searches for only sum 1 (18m resolution) images.
- We will leave the remaining search fields empty this time so our search is not too specific.
- Click the "OK" button and wait for the stamps to appear in the Viewing Window. Depending on your connection speed, this could take a minute or two.
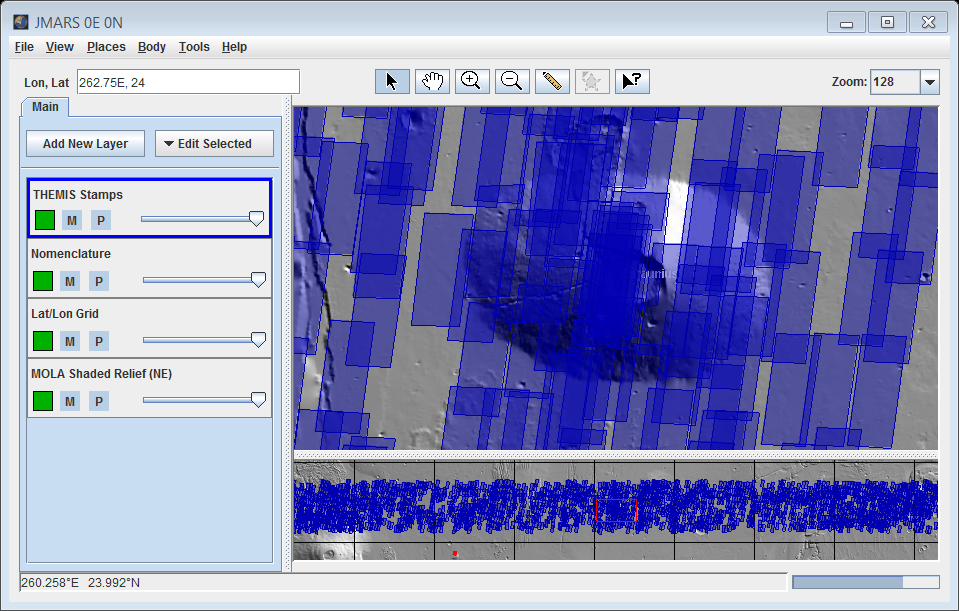
- The outlines drawn in blue represent the images that have been taken in the latitude band that includes the summit of Ceraunius Tholus.
- In the Layer Manager, go to the THEMIS Stamp Layer tab, then to the "Settings" Tab. Adjust the transparency slider (Fill Alpha) to the middle of the slide bar.
- Now it is easier to see which areas have been covered and which areas haven't. If you zoom in close enough, you'll notice that the entire summit of Ceraunius Tholus is covered except for a thin gap.

Step 4: Identify the Next THEMIS Overflight By Loading the Groundtrack Layer
- In the Layer Manager, click "Add New Layer" -> "Groundtrack". Double-click on the "Groundtrack" tab to view the layer's focus panel.
- For this example, we will assume that the next available orbit being planned by the mission planners is orbit 25250. The observations for all previous orbits have already been sent to the spacecraft, so you can only look for observation opportunities in orbit 25250 and beyond. Enter this as the Groundtrack start time in the focus panel.
- Enter a Groundtrack end time in the focus panel.
- The more orbits you try to load, the longer it will take for the Groundtrack Layer to draw them. It is best to search in increments of 100 orbits.
- If you prefer to use a different time format, such as UTC or Ephemeris Time, you can enter them in these fields instead of orbit numbers. See the Time Formats section for proper formatting.
- Click "Update" to draw the groundtracks.
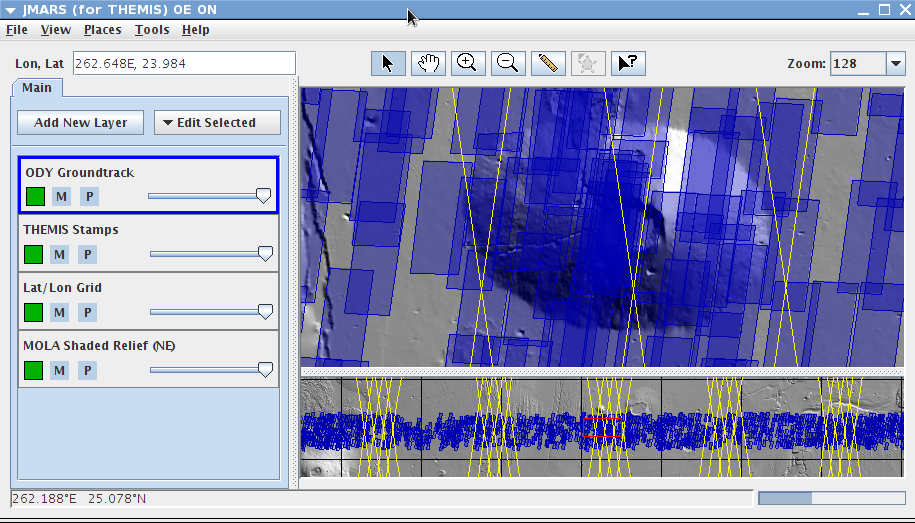
- The Groundtrack Layer will draw two sets of lines, which in this case lie around Ceraunius Tholus. Those slanting downward from left to right are the night passes and those slanting upward from left to right are the day passes. Since we are interested in VIS observation opportunities, we can only use the day passes.
- Notice that one of the daytime groundtracks passes directly through the gap in 18m VIS coverage we noticed earlier. This will be the next possible opportunity to fill the gap in the 18m VIS coverage.

Step 5: Prepare an Image Request
- Unfortunately, due to limited data downlink, only members of the THEMIS Science Team and graduate students working under them are allowed to submit imaging requests. If you fit this description, please read on to learn how to put together an imaging request.
- In this situation, where only one image is needed to complete coverage over an area you are studying, making an individual imaging request is the best way to ensure our mission planners schedule the observation. If you need more coverage of an area, usually more than three images, it might be better to submit an ROI using the Region of Interest Layer. If you have any questions about which method is more appropriate for your situation, please see one of the mission planners.
- Place the mouse pointer over the part of the ground track that passes over the gap and record the ephemeris time displayed on the tooltip.
- In this case, the value should be approximately "et:241590272"
- Keeping the mouse pointer in the same location, records the cursor position displayed at the lower-left of the Viewing Window.
- In this case, the value should be approximately "262.97E, 24.18N"
- To make an imaging request, forward the ET time, the geographic location and a description of the observation you would like made to the mission planners.
- In this case, you should note that the requested image should fill the gap seen in the 18m VIS stamps.
- Image requests should be submitted to mission planners at least a week in advance. If you have any questions about planning deadlines, see the mission planners.
Congratulations! You have finished the third JMARS tutorial!


