- Home
- Getting Started
- Documentation
- Release Notes
- Tour the Interface
- Tour the Layers
- JMARS Video Tutorials
- Lat/Lon Grid Layer
- Map Scalebar
- Nomenclature
- Crater Counting
- 3D
- Shape Layer
- Mosaics
- Map
- Advanced/Custom Maps
- Graphic/Numeric Maps
- Custom Map Sharing
- Stamp
- THEMIS
- MOC
- Viking
- CRISM Stamp Layer
- CTX
- HiRise
- HiRISE Anaglyph
- HiRISE DTM
- HRSC
- OMEGA
- Region of Interest
- TES
- THEMIS Planning
- Investigate Layer
- Landing Site Layer
- Tutorials
- Video Tutorials
- Displaying the Main View in 3D
- Finding THEMIS Observation Opportunities
- Submitting a THEMIS Region of Interest
- Loading a Custom Map
- Viewing TES Data in JMARS
- Using the Shape Layer
- Shape Layer: Intersect, Merge, and Subtract polygons from each other
- Shape Layer: Ellipse Drawing
- Shape Layer: Selecting a non-default column for circle-radius
- Shape Layer: Selecting a non-default column for fill-color
- Shape Layer: Add a Map Sampling Column
- Shape Layer: Adding a new color column based on the values of a radius column
- Shape Layer: Using Expressions
- Using JMARS for MSIP
- Introduction to SHARAD Radargrams
- Creating Numeric Maps
- Proxy/Firewall
- JMARS Shortcut Keys
- JMARS Data Submission
- FAQ
- Open Source
- References
- Social Media
- Podcasts/Demos
- Download JMARS
JMARS ›
THEMIS Planning Layer
The THEMIS Planning Layer, which is only available in the THEMIS release of JMARS, allows mission planners to schedule observations for the THEMIS camera aboard Mars Odyssey. All THEMIS team members can access the Planning Layer, but only those with special permissions have access to the actual observation planning capabilities.
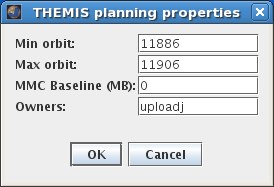
Loading the THEMIS Planning Layer
- Open the Planning Layer: In the Layer Manager, choose "Add New Layer" -> "THEMIS Planning"
- Enter Initial Parameters: A number of parameters must be set before the THEMIS Planning Layer can be opened:
- Minimum Orbit: The first orbit for which the user is planning or viewing observations. (Required)
- Maximum Orbit: The last orbit for which the user is planning or viewing observations. (Required)
- MMC Baseline:The known or predicted amount of data (in MB) on the MMC at the beginning of the given orbit range. (Not Required)
- Owners: The users whose observations should be displayed. (At least one user is required, additional comma-seperated users are optional.)
- Load the Planning Layer: Clicking the "OK" button will draw the THEMIS groundtracks for the given orbit range in the Viewing Window and open the "THEMIS Planning" focus panel tab in the Layer Manager.
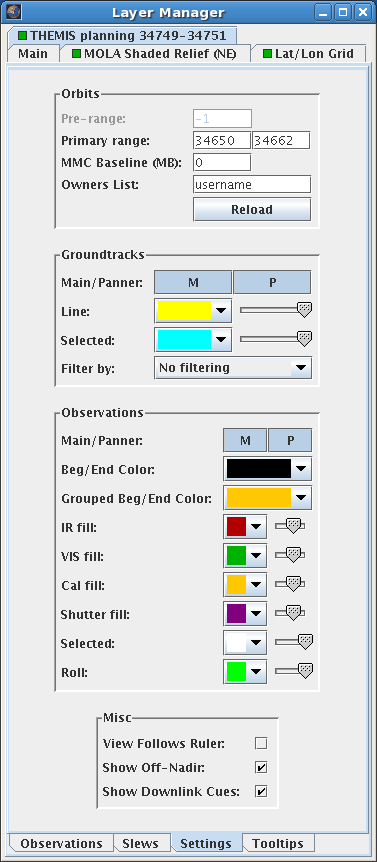
THEMIS Planning Layer Functions
The THEMIS Planning Layer's focus panel can be accessed by clicking on the "THEMIS Planning" tab in the Layer Manager. The focus panel gives users access to the following four function tabs.
- Settings Tab
- Orbits: These options allow the user to change the Orbit Range, MMC Baseline and Username which were set when the Planning Layer was opened. The "Reload" button must be clicked after any changes are made in order to update the information displayed in the Viewing Window.
- Groundtracks:These options allow the user to add/remove the groundtrack in both the Main and Panning Views and to change the color and transparency of the selected and unselected groundtrack lines. Users are also given the option to filter the groundtracks so only specific segments are visible, such as Day or Night (determined by illumination level) and Descending or Ascending (descending=traveling north to south, ascending=traveling south to north).
- Observations:These options allow the user to add/remove the displayed observations from the Main and Panning Views and to change the colors assocaited with different types of observations. (This does not add/remove the actual observations, it only determines whether or not they will be displayed.)
- Miscellaneous
- The "View Follows Ruler" option will re-center the Main and Panning Views to run parallel to a selected groundtrack. This replicates, although not exactly, the old JMARS Time Mode.
- The "Show Off-Nadir" option will show any off-nadir slews that have been planned. The nominal groundtrack will be represented by a broken line and the actual off-nadir THEMIS groundtrack will be represented by a solid line.
- The "Show Downlink Cues" option will add grey shading to the OPTG ruler to represent periods where ODY is downlinking, so the mission planners can try to avoid planning off-nadir slews during those times.
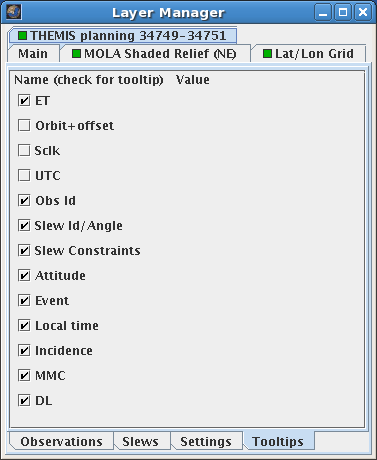
- Tooltips Tab
- Time Formats: These checkboxes allow the user to chose which time formats are displayed in the tooltip when the cursor is placed over a groundtrack. Multiple time formats can be chosen and displayed simultaneously.
- Additional Tooltip Information: These checkboxes allow the user to add additional information to the mouse-over tooltip.
- Observations Tab
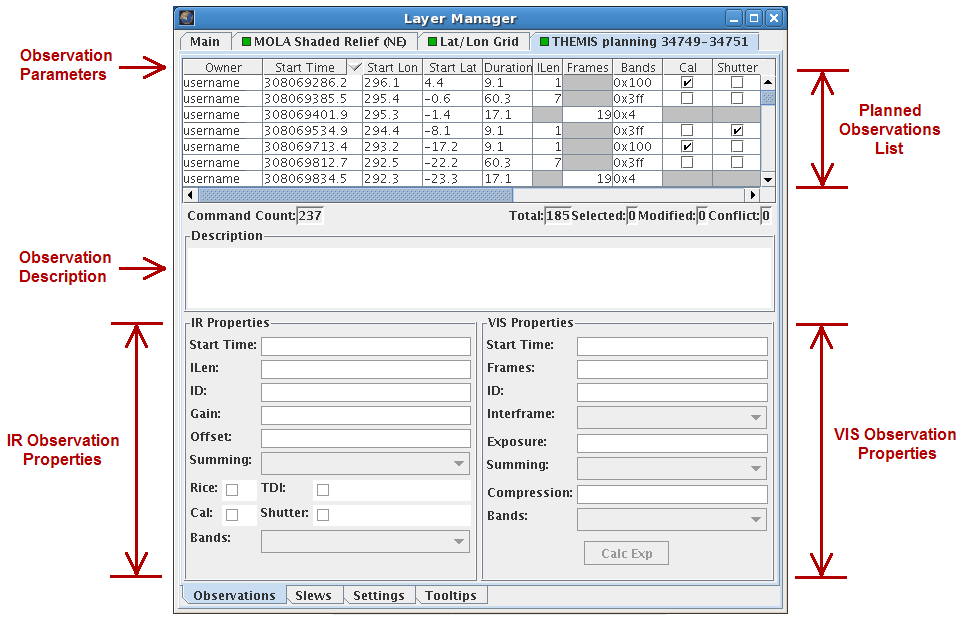
- Observations Table: The table in the Observations tab lists all observations in the given orbit range along with their various parameters. Users can sort the observations according to the parameters by clicking on the column titles. Observations selected in the Viewing Window will be highlighted in the table, and vice-versa. At the bottom of the table are some basic statistics: the number of commands required for the observations, the number of observations, number of selected observations, number of modified observations and the number of observations in conflict with other observations.
- Description:All THEMIS observations can be given text descriptions. Normally these are used to describe the region being observed or the imaging campaign that targeted the observation.
- IR Properties
- Start Time: The start time of the image given in ephemeris time (et).
- ILen: The duration of the IR observation. (7 ILen = 1 minute)
- Observation ID: A placeholder with a default value of "255". The official ID will be automatically generated when the observation is finalized before uplink to THEMIS.
- Gain: A placeholder with a default value of "16". Appropriate gain values will be automatically calculated when the observation is finalized before uplink to THEMIS.
- Offset:A placeholder with a default value of "99". Appropriate offset values will be automatically calculated when the observation is finalized before uplink to THEMIS.
- Summing: A spatial summing value between 1 (highest resolution) and 160 (lowest resolution).
- Rice: Enables/Disables rice compression of the observation before downlink. The default value is "Enabled".
- TDI: Enables/Disables the time delay and integration (TDI) mode. The default value is "Enabled".
- Cal: Indicates whether or not the IR observation is a Calibration Image.
- Shutter: Indicates whether or not the IR observation is a Shutter Image.
- Bands: Sets the band configuration of the IR observation using pre-set configurations.
- VIS Properties
- Start Time: The start time of the image given in ephemeris time (et).
- Frames: The duration of the image given as the number of frames.
- Observation ID: A placeholder with a default value of "255". The official ID will be automatically generated when the observation is finalized before uplink to THEMIS.
- Interframe Delay:The time delay between frames. The current optimum setting is 0.9s.
- Exposure: The length of the exposure in tenths of a millisecond, which can be either manually entered or automatically calculated by clicking the "Calc Exp" button.
- Summing: A spatial summing value of either 1 (18m/pixel), 2 (36m/pixel) or 4 (72m/pixel). Unlike the IR camera, the VIS camera only has three spatial summing levels.
- Compression: A placeholder for the VIS image compression factor. The default value is "65535" and will be automatically replaced by appropriate compression values when the observation is finalized before uplink to THEMIS.
- Bands:Sets the band configuration of the VIS image using pre-set configurations.
- Slews Tab
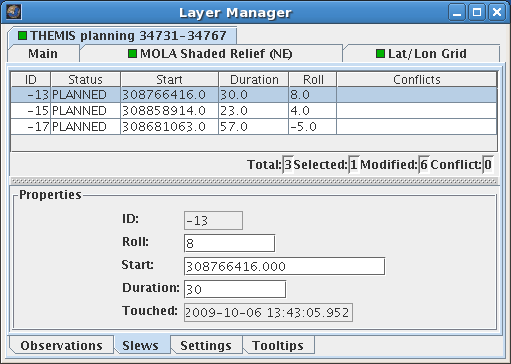
- Slew Table: The table under the Slews tab lists all slews that have been planned in the given orbit range along with their various parameters.Users can sort the slews according to any of the parameters by clicking on the column titles.
- Slew Properties
- Slew ID: A placeholder for the slew ID number, which will be automatically generated when the slews are finalized before being sent to JPL and Lockheed.
- Roll Angle: The commanded roll angle, in degrees, about Odyssey's velocity vector with positive defined by the right-hand rule.
- Slew Start:The start time of the slew given in ephemeris time (et). The start time is defined as the beginning of the stabalized portion of the slew that can be used for off-nadir imaging.
- Slew Duration:The duration, in seconds, of the stablized portion of the slew. The settling time before and after the stabilized portion of the slew is not included in the duration measurement.
- Touched: The last time the database entry for the given slew was modified. Once slews have been finalized, they cannot be edited.
THEMIS Planning Layer Rulers
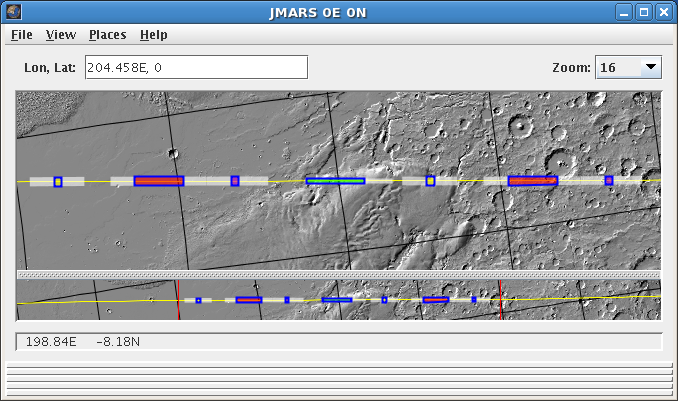
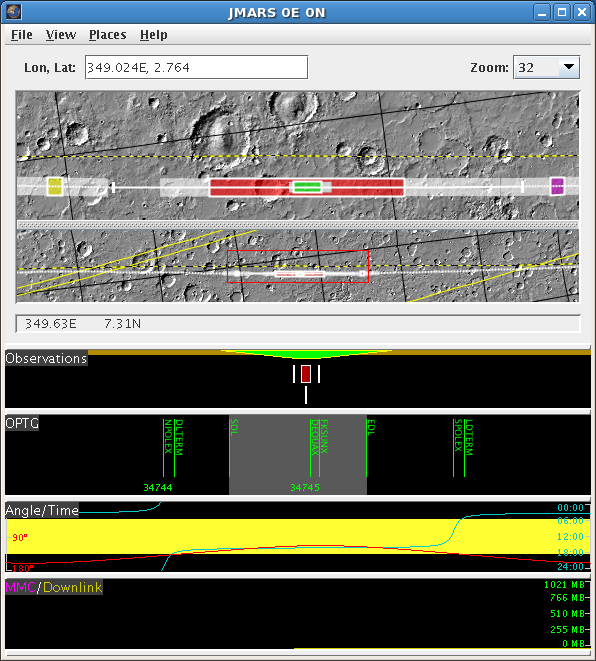
The THEMIS Planning Layer also includes four "rulers", which are displayed in the Viewing Window underneath the Panning View. The behavior of the rulers is similar to the behavior of the Panning Window, but instead of displaying a wide-angle view of the maps they display information related to the planning orbit range in left-to-right chronological order. Double-clicking in any ruler will automatically re-center the Main and Panning Views on that time.
If users have enabled the "View Follows Ruler" option under the Settings Tab, the groundtrack will run parallel to the rulers, which can be synced with the Main View by setting both to identical zoom levels. Otherwise, a point on the rulers does not necessarily correspond with the points in the Main and Panning Views directly above it. In this case, when the mouse cursor is over a ruler, a set of red crosshairs will appear on the groundtrack in the Main and Panning Views at the corresponding location. Users can hide some or all of the rulers by right-clicking on them.
- Observations Ruler: The Observations Ruler displays markers for all observations that have been planned in the given orbit range. The markers are displayed in the same color as the observations they represent (ie: VIS images appear as green markers, etc). This ruler also has a thin bar at the top which shows when slews occur. Yellow areas are where slews are allowable, the red areas are slew keepout zones and the green areas are planned or finalized slews.
- OPTG Ruler: The OPTG Ruler displays markers for certain events in each orbit, which are explained below. This data is obtained from the weekly OPTG file that should be updated before any THEMIS planning is done.
- DEQUAX:Descending Equator Crossing
- DLTERM: Dark-to-Light Terminator Crossing
- FKSUNX:Fake Sun Crossing (Crossing the Sub-Solar Latitude)
- LDTERM: Light-to-Dark Terminator Crossing
- NPOLEX: North Pole Crossing
- SPOLEX: South Pole Crossing
If the "Show Downlink Cues" option is enabled in the "Settings" tab all downlink periods will appear as grey areas on this ruler. This helps the mission planners to avoid commanding slews during communications passes, which could significantly reduce the amount of data that Odyssey can downlink during that pass.
- Angle/Time Ruler: The Angle/Time Ruler displays plots of the solar incidence angle (red) and the local time on the surface (blue). The exact numerical values of both are displayed in a tooltip when the mouse cursor is placed over the ruler.
- MMC/Downlink: The MMC/Downlink ruler displays the amount of data that will be collected during the given orbit range. In order to prevent filling or emptying the THEMIS mass memory card (MMC), mission planners usually only collect enough data to fill the daily downlink, which prevents any net change in the total amount of data on the instrument. If there will already be data on the MMC at the beginning of their orbit range, they can enter the amount in the "MMC Baseline" field when opening the Planning Layer. This will allow the ruler to produce an accurate plot of MMC levels throughout the planning orbit range.
Planning a VIS Observation
- Open the THEMIS Planning Layer: Using the instructions above, open the Planning Layer and select it as the active layer in the Layer Manager.
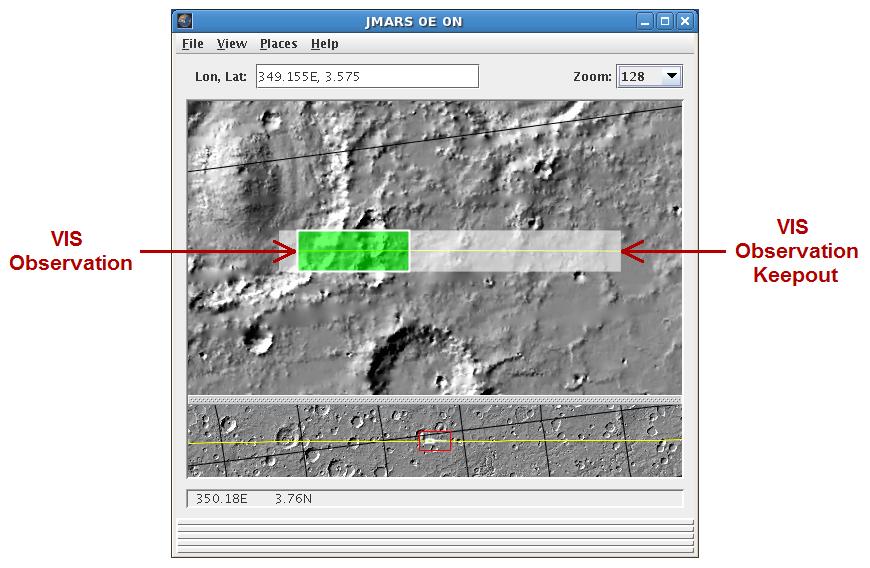
- Planning a VIS Observation: In the Main View, right-click on the groundtrack at the location where the VIS observation will begin, select "New Observation" and then choose the type of VIS observation from the available list.
- VIS 1 Band: A band 3 (RED) 18m resolution observation. This is the most common type of VIS image and is the type used for high-resolution mapping.
- VIS Color: A four band (2,3,4,5) 18m resolution observation. This is the most common multiband image and can be used to produce approximate true-color images.
- VIS Polar:A band 3 (RED) 36m resolution observation, most commonly used for the polar monitoring campaigns and large-area mapping.
- If the desired VIS observation type is not in the list, chose the closest one and then edit the parameters in the focus panel manually. (See Step 4 below.)
- Adjust VIS Observation Location: If the observation needs to be re-positioned, left-click and drag the observation to a new location along the groundtrack.
- Adjust VIS Observation Parameters: At the very least, users must always set the image exposure, which can either be entered manually or automatically calculated by clicking the "Calc Exp" button in the focus panel. Mission planners may occasionally need to adjust some of the other parameters manually.
- Commit the Observation: To add the planned observations to the database prior to uplink, right-click anywhere in the Main View and chose "Commit All Changes". (NOTE: Even if you have access to the Planning Layer, only mission planners are able to commit observations to the database. All other users will receive an error.)
Planning an IR Observation
- Open the THEMIS Planning Layer: Using the instructions above, open the Planning Layer and select it as the active layer in the Layer Manager.
- Planning an IR Observation: In the Main View, right-click on the groundtrack at the location where the IR observation will begin and select "New Observation". Then choose from one of the pre-set IR observation lengths.
- 7 ILen = 1 minute
- If the desired observation length is not on the list, chose the closest one and edit the ILen manually in the focus panel.
- The preferred maximum length of a THEMIS IR observation is 8 min (ILen=56). Longer IR images are difficult to properly process and calibrate.
- Adjust IR Observation Location: If the observation needs to be re-positioned, left-click and drag the observation to a new location along the groundtrack.
- Adjust IR Observation Parameters: Normally users will only need to adjust the ILen (if necessary) and the band configuration. Mission planners may occasionally need to manually adjust some of the other parameters.
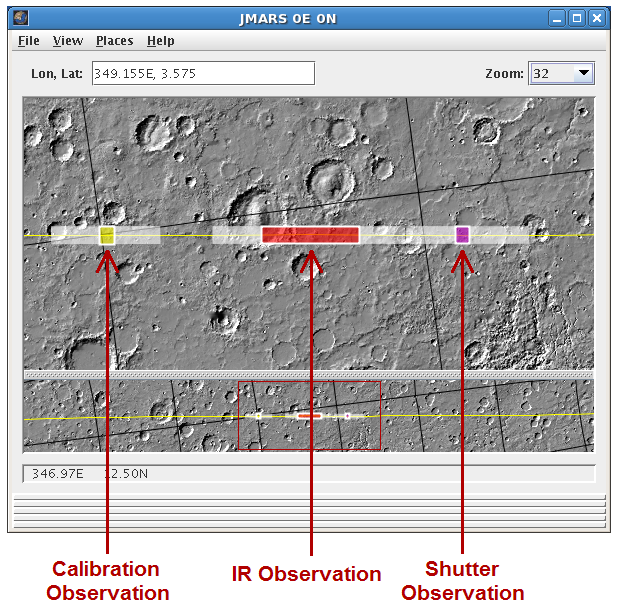
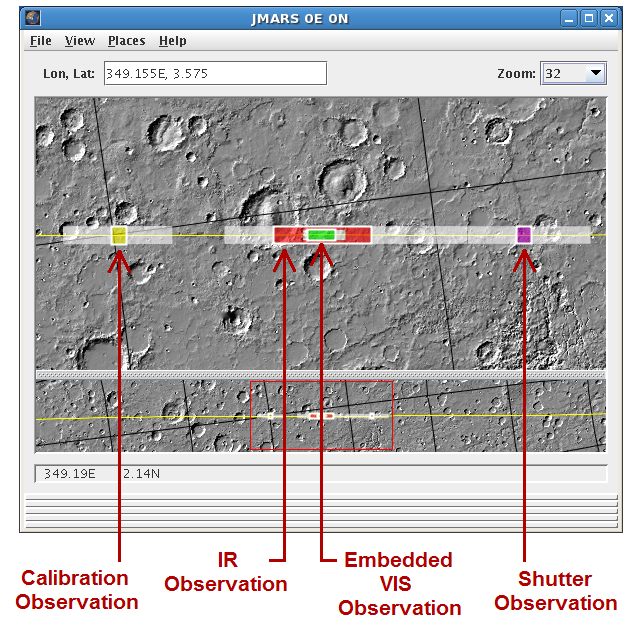
- Add an Embedded VIS: THEMIS has the ability to take a VIS image and an IR observation simultaneously. If desired, the user can select the IR observation, right-click, select "New Observation" and select the desired VIS image type. The VIS image can then be moved within the IR image and its parameters can be edited like normal. (Don't forget to set the exposure!)
- Add Calibration and Shutter Images: All IR observations need to be accompanied by correctly positioned calibration and shutter images in order to be properly processed and calibrated. To add these images, right-click on the IR observation in the Main View, chose "Autodrop" and chose "Create Both Auto Cal and Shutter". Users can also drop a Cal or Shutter image individually by choosing those options under "Autodrop".
- Commit the Observation: To add the observations to the database, right-click anywhere in the Main View and chose "Commit All Changes". (NOTE: Even if you have access to the Planning Layer, only mission planners are able to commit observations to the database. All other users will receive an error.)
Planning a Slew
- Open the THEMIS Planning Layer: Using the instructions above, open the Planning Layer and select it as the active layer in the Layer Manager.
- Planning a Slew: In the Main View, right-click on the groundtrack at the location where the slew will be centered and select "Create Slew".
- The nominal nadir groundtrack will now appear as a dashed line.
- The stable position of the off-nadir slew will appear as a separate solid line. Normally, all imaging will take place in this portion of the slew.
- The non-stable portions of the off-nadir slew will appear as dotted lines on both sides of the stable portion. Although imaging during these periods is allowed, the spacecraft will be actively rolling and imaging is not recommended.
- Adjust Slew Location: The length and location of the slew can be changed by dragging the two bars that bound the stable portion of the slew along the grandtrack.
- The sidebars must be moved individually.
- As the sidebars are moved, the unstable portion of the slew will move as well. Make sure you don't expand the unstable portions over any existing observations.
Copying & Pasting Observations
- Select Observation(s): To select a single observation, left-click on it. To select multiple observations, either left-click on them while holding the Ctrl key or left-click and drag to create a selection box.
- Copy the Observation(s): Right-click on one of the selected observations and chose "Edit" -> "Copy"
- Paste the Observation(s): Right click on the groundtrack at the location where you wish to paste the observations, chose "Edit" and then choose either "Paste with Start at ET:#########" or "Paste with Center at ET:#########"
- Commit Observations: Right-click anywhere in the Main View and chose "Commit All Observations"
Grouping Observations
- Select Observations: To select multiple observations, left-click on them while holding the Ctrl key or left-click and drag to create a selection box.
- Group the Observations: Right-click on one of the selected observations and chose "Group". Once grouped, the observations will behave as if they are a single observation. They can be moved, copied and pasted without changing the relative spacing between them. When pasted, the new copy will be grouped by default.
- Ungroup the Observations: Right-click on the group of observations and chose "Ungroup". The observations will now behave as individual observations again.
- Commit Observations: Right-click anywhere in the Main View and chose "Commit All Observations". Observations do NOT need to be ungrouped prior to committing.


