
- Home
- Getting Started
- Documentation
- Release Notes
- Tour the Interface
- Tour the Layers
- JMARS Video Tutorials
- Lat/Lon Grid Layer
- Map Scalebar
- Nomenclature
- Crater Counting
- 3D
- Shape Layer
- Mosaics
- Map
- Advanced/Custom Maps
- Graphic/Numeric Maps
- Custom Map Sharing
- Stamp
- THEMIS
- MOC
- Viking
- CRISM Stamp Layer
- CTX
- HiRise
- HiRISE Anaglyph
- HiRISE DTM
- HRSC
- OMEGA
- Region of Interest
- TES
- THEMIS Planning
- Investigate Layer
- Landing Site Layer
- Tutorials
- Video Tutorials
- Displaying the Main View in 3D
- Finding THEMIS Observation Opportunities
- Submitting a THEMIS Region of Interest
- Loading a Custom Map
- Viewing TES Data in JMARS
- Using the Shape Layer
- Shape Layer: Intersect, Merge, and Subtract polygons from each other
- Shape Layer: Ellipse Drawing
- Shape Layer: Selecting a non-default column for circle-radius
- Shape Layer: Selecting a non-default column for fill-color
- Shape Layer: Add a Map Sampling Column
- Shape Layer: Adding a new color column based on the values of a radius column
- Shape Layer: Using Expressions
- Using JMARS for MSIP
- Introduction to SHARAD Radargrams
- Creating Numeric Maps
- Proxy/Firewall
- JMARS Shortcut Keys
- JMARS Data Submission
- FAQ
- Open Source
- References
- Social Media
- Podcasts/Demos
- Download JMARS
Loading a Custom Map with Advanced Map
The purpose of this tutorial is to walk users through the process of opening JMARS, navigating to Warrego Vallis using the Nomenclature Layer and loading a custom map into JMARS using the Advanced Maps Layer. The JMARS Public Release will be used for this tutorial, although the THEMIS Team Release is very similar and team members should be able to follow along.
Step 1: Opening JMARS
- Start JMARS
- Enter your JMARS user name and password. If you do not have a user name and password, follow the instruction under the appropriate "Getting Started" link on the Main Page.
- At this point, the Layer Manager should only have the MOLA Shaded Relief Layer, Nomenclature and the Lat/Lon Layer loaded.
- Remove the MOLA Shaded Relief map by highlighting it in the Layer Manager and clicking "Delete Layer"
- Add the MOLA Colorized Elevation map by clicking "Add New Layer" -> "Maps By Instrument" -> "MOLA" -> "MOLA Colorized Elevation"
- At this point, the Layer Manager should only have the MOLA Shaded Relief/Colorized Elevation Layer and the Lat/Lon Layer loaded.
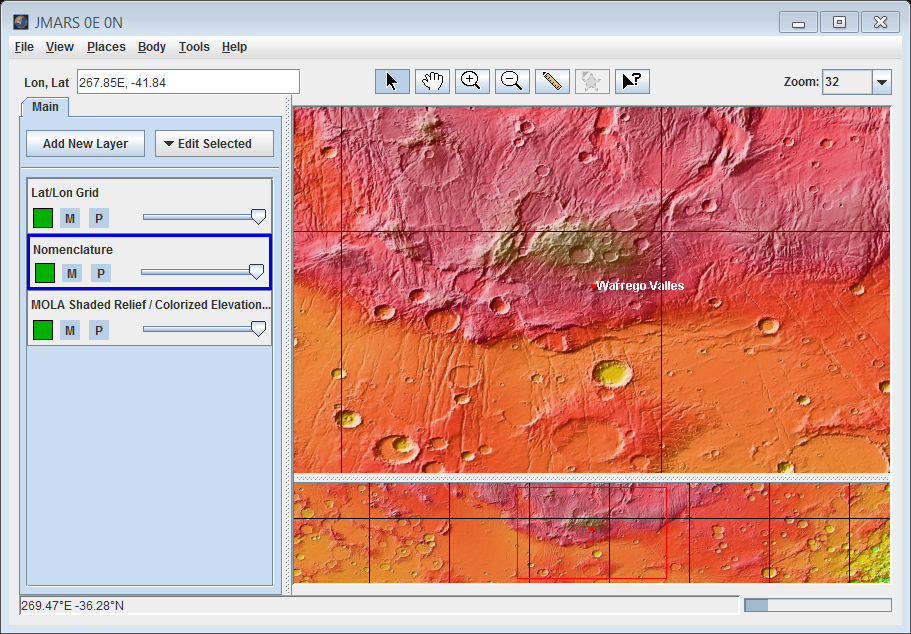
Step 2: Navigating to Warrego Valles Using the Nomenclature Layer
- In the Layer Manager, click "Add New Layer" -> "Nomenclature". Then double- click on the "Nomenclature" tab to see the layer's focus panel.
- In the "Selected Landmarks" section, select "Vallis
- In the "Navigation" section, "Vallis" should be listed under "Landmark Type". Locate and select "Warrego Valles" in the "Landmark" drop-down box. Then click "Goto". The Viewing Window will recenter on Warrego Valles.
Step 3: Loading a Custom Map
- Download warrego.cub by right-clicking on the link and chosing "Save As". This is a custom map (ISIS cube) of a section of Warrego Valles.
- In the Layer Manager, click "Add New Layer" -> "Advanced Map"
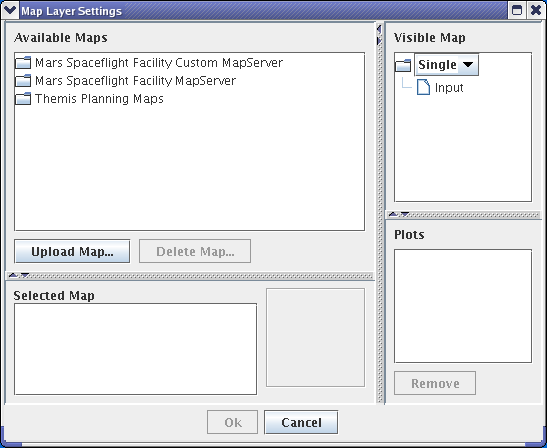
- The Map Layer Settings window will open.
- The Map Layer Settings window will open.
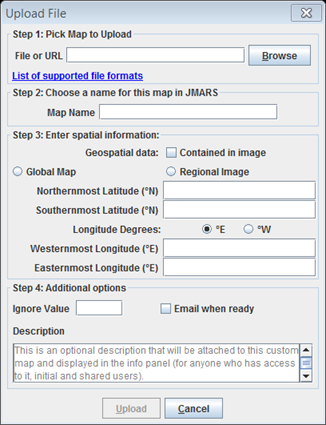
- In the "Available Maps" section click "Upload Map".
- In the "Upload File" pop-up box, enter the file path to the warrego.cub file you just downloaded and click "Upload".
- Depending on the file size, it may take a few minutes to load the map into the Maps Space Flight Facility's mapserver.
- If the custom map has a specified value for transparency (warrego.cub's transparency value is zero) enter the value in the "Ignore Value" box.
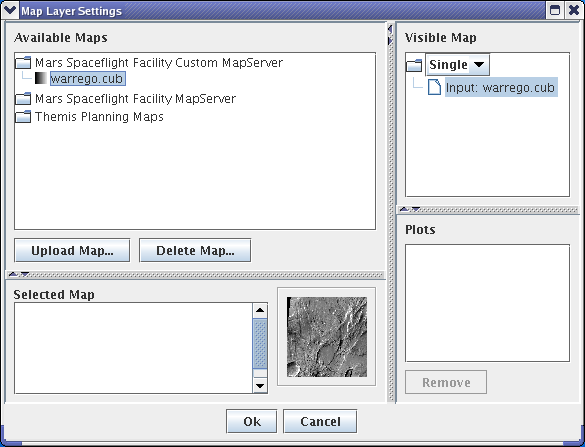
- The warrego.cub file should be shown under the "Mars Spaceflight Facility Custom MapServer". You may need to double-click on "Mars Spaceflight Facility Custom MapServer" in order to see the custom maps you have loaded.
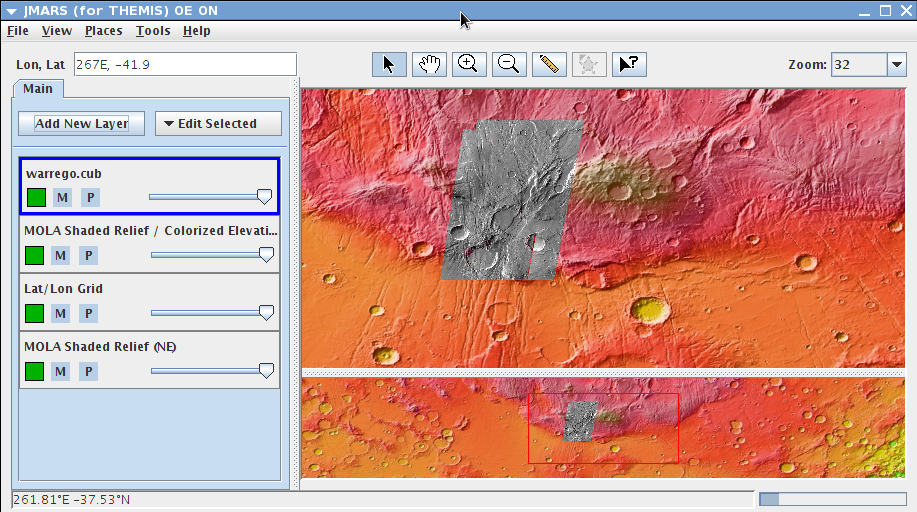
- Click and drag warrego.cub from under "Mars Spaceflight Facility Custom MapServer" and drop it on the "Input" line of the "Visible Map" box.
- The "Input" line should now read "Input: warrego.cub"
- Click "Ok" to load the warrego.cub map into the JMARS Viewing Window
- The warrego.cub custom map is black and white, so it should stand out against the MOLA colorized elevation map.
- What If the Background of a Custom Map is Black (Not Transparent)?
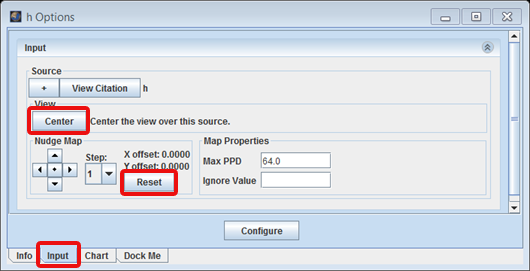
- In the Layer Manager, double-click on the tab named after the custom map that you just uploaded to access its focus panel. Then click on the "Input" tab.
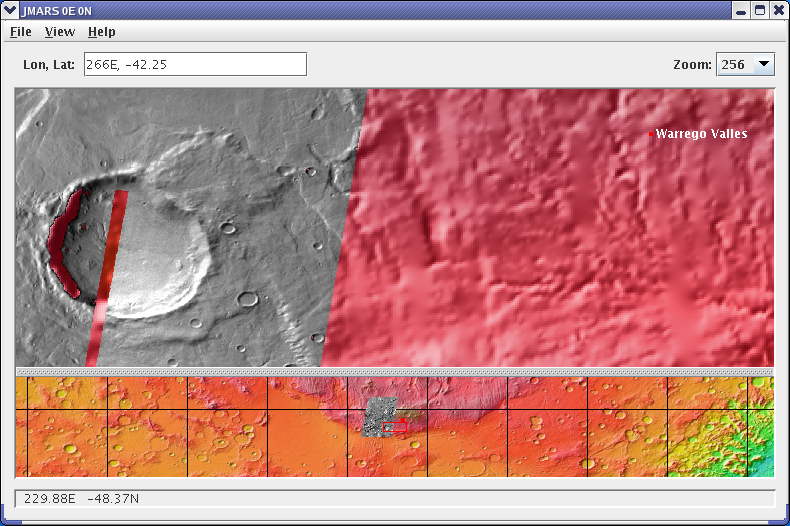
- Zoom the Main View of the Viewing Window to 256 ppd and adjust the position of the custom map in the Main View using the arrows in the "Input" tab" to see how well it lines up with the surrounding terrain.
- Using the arrow keys in the "Input" window, shift the custom map three pixels to the right. (Since the pixel number in the center of the arrows is set to "1", each click of an arrow will move the custom map in that direction by one pixel.
- Click on the "1" at the center of the arrows until it becomes "10". Then move the custom map up by 20 pixels.
- Obviously, the original position of the map was much better than the current position, so click the "Reset" button next to the arrow keys to return the map to its original position.
- Keep in mind that JMARS will automatically save the moved image, so if you do not want to save the new location press the "Reset" button.
- In the "Available Maps" section of the Settings window, under "Mars Spaceflight Facility Custom MapServer", click on warrego.cub.
- Click "Delete Map", which will remove the custom map from the Custom Map Server
If you would like to try to upload a custom map you can follow along using your own image or the provided warrego.cub image below.
Step 4: Editing the Custom Map Settings
Step 5: Deleting the Custom Map
Congratulations! You have finished the sixth JMARS tutorial!
PREVIOUS: Loading a Custom Map NEXT: Viewing TES Data in JMARS