
- Home
- Getting Started
- Documentation
- Release Notes
- Tour the Interface
- Tour the Layers
- JMARS Video Tutorials
- Lat/Lon Grid Layer
- Map Scalebar
- Nomenclature
- Crater Counting
- 3D
- Shape Layer
- Mosaics
- Map
- Advanced/Custom Maps
- Graphic/Numeric Maps
- Custom Map Sharing
- Stamp
- THEMIS
- MOC
- Viking
- CRISM Stamp Layer
- CTX
- HiRise
- HiRISE Anaglyph
- HiRISE DTM
- HRSC
- OMEGA
- Region of Interest
- TES
- THEMIS Planning
- Investigate Layer
- Landing Site Layer
- Tutorials
- Video Tutorials
- Displaying the Main View in 3D
- Finding THEMIS Observation Opportunities
- Submitting a THEMIS Region of Interest
- Loading a Custom Map
- Viewing TES Data in JMARS
- Using the Shape Layer
- Shape Layer: Intersect, Merge, and Subtract polygons from each other
- Shape Layer: Ellipse Drawing
- Shape Layer: Selecting a non-default column for circle-radius
- Shape Layer: Selecting a non-default column for fill-color
- Shape Layer: Add a Map Sampling Column
- Shape Layer: Adding a new color column based on the values of a radius column
- Shape Layer: Using Expressions
- Using JMARS for MSIP
- Introduction to SHARAD Radargrams
- Creating Numeric Maps
- Proxy/Firewall
- JMARS Shortcut Keys
- JMARS Data Submission
- FAQ
- Open Source
- References
- Social Media
- Podcasts/Demos
- Download JMARS
Home ›
Frequently Asked Questions (FAQ)
This section contains a number of frequently asked questions about JMARS along with useful tips on getting the most out of the various layers and data formats that JMARS can work with.
Getting Started
JMARS functionality allows users to send diagnostic information to the JMARS team. This information can be helpful in finding, understanding and replicating an issue that the user is seeing. The user also has the opportunity to send any useful information about the issue such as steps to re-create the problem. This functionality may also be used to send general JMARS questions to the team.
To send a help request from within JMARS:
- Select Help -> Report a Problem (shortcut key combination is "alt + h" to get help menu, then "r" to bring up the "Report a Problem" dialog)
- Enter your email address in the "Email Address" text input field
- Enter any relevant information, questions, steps to re-create the issue, etc., in the "How to Recreate the Problem" input text area
- Click the "Send" button
The JMARS team will receive and process your help report.
JMARS needs outbound access to the following sites:
-
- Ports 80 & 443 access to *.mars.asu.edu
Citation Policy
Acknowledgement of the JMARS site and its resources in your papers will help ensure the continuing support necessary to maintain, develop, and improve JMARS, including the addition of new datasets.
For news media or educational purposes, please credit images created through JMARS as: NASA/JPL-Caltech/Arizona State University.
If you use JMARS in a research work, please mention it in any relevant captions and put the following in your references: Christensen, P.R.; Engle, E.; Anwar, S.; Dickenshied, S.; Noss, D.; Gorelick, N.; Weiss-Malik, M.; JMARS – A Planetary GIS, http://adsabs.harvard.edu/abs/2009AGUFMIN22A..06C
Citation Page
If you have have cited JMARS and would like it added to the citation page please send your citation to mesmith@mars.asu.edu
Sometimes the Linux Installer is not executable after it is downloaded due to changes made by various virus scanners. To change this, open a terminal window and change to the directory where the installer was downloaded. Run the command:
>chmod 777 jmars-public_setup_linux
Now you should be able to run the installer from either the terminal window or your desktop environment.
Map Layer
If you want the numeric value for a single location, do the following:
- Go to Advanced map
- Find the map you want to see single pixel values for and drag it to the 'Plots' area in the lower right.
- Expand the list of available maps and find one you want to see, drag it to the upper right area under 'Single', or change that combo box to 'None' if you don't want to see a map.
- Hit OK.
- Hover the mouse over the point of interest in the map, and wait there; a tooltip will come up to show you the values for all Plot maps at that position.
Other pages that you may be interested in
Advanced Custom Map TutorialSometimes custom maps load with the background black (not transparent) due to the range of values used in the custom map data. To display the map with the background transparent:
- In the Layer Manager, delete the custom map.
- Reload the custom map as before, but in the upload box type "0" (zero) in the ignore field.
- Continue opening the map as normal.
Your custom map will now have the background set to transparent.
Shape Layer
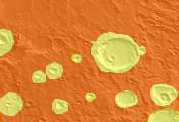
It is not possible to draw "doughnut" polygons with the JMARS shape layer, however, the same effect may be achieved by drawing the inner (yellow in example above) and outer polygons (orange) and then arranging the display order of your polygons. To arrange the display order, left click on the row with the polygon of interest and drag it up or down.
In the "Features" section of the Shape Layer focus panel, users can edit a particular field for multiple rows simultaneously by:
-
- Highlight the rows you want to edit.
- Right-click on the column you want to edit for the selected rows.
- Select "Edit Column of Selected Row"
- Enter either a value or text in the pop-up input window and click "Ok"
- All of the highlighted rows will reflect the change in the selected column.
Stamp Layer
Projected Brightness Temperature (IR-PBT) and De-correlation Stretch (IR-DCS) products must be processed for each THEMIS IR observation in order for all of the THEMIS Stamp Layer's new IR rendering options to work properly. As progress has been made generating these products, it has been discovered that the disk-space saving "Rectified" format originally applied to all projected products significantly compromises the quality of the images when viewed in JMars. Therefore, only the IR-GEO and the 4-Panel-DCS products will be saved in the RECTIFIED format, while all IR-PBT & IR-DCS images will be saved in FULL PROJECTION format.
The table below summarizes the current processing status by orbit range
| Orbit Range | Release Status | PBT/DCS Processing Status | PBT/DCS Format | ||
|---|---|---|---|---|---|
| 816 - 2399 | Team Access | Nominal mapping should be available;
still validating that off-nadir images collected during these orbits are being handled appropriately |
FULL PROJECTION | ||
| 2400 - 5799 | Public | Completed | FULL PROJECTION | ||
| 5800 - 8599 | Team Access | In Validation | FULL PROJECTION | ||
| 8600 - 8699 | Not Available | Not Started (off-nadir) | N/A | ||
| 8700 - 24599 | Team Access | In Validation | FULL PROJECTION | ||
| 24600 - 26799 | Team Access | In Process | FULL PROJECTION | ||
| 26800 - 28999 | Team Access | Available, but will be revised for projection parameter change | RECTIFIED | ||
| 29000 - 34499 | Public | Completed | FULL PROJECTION | ||
| 34500 - present | Team Access |
|
FULL PROJECTION |
Last Updated: 2010-Mar 26 12:00:00 MST
Definition of Processing Status Description:
- Not Started: Processing of PBT and DCS data products has not yet begun for the given orbit range.
- In Process: PBT and DCS are currently being processed for the given orbit range and will be available soon.
- Any images visible in the THEMIS Stamp Layer should be considered incomplete and should not be used.
- In Validation: PBT and DCS have been produced for the given orbit range and are being validated by the archivist.
- Most images should be available in the THEMIS Stamp Layer and ready for use.
- If you see any wacky images, please report the file-id to the archivist (Thanks!)
- Completed: PBT and DCS products have been produced for the given orbit range and can be rendered in the THEMIS Stamp Layer.
- Rectified / Full Projection: Products should be available in JMars in either format;
- RECTIFIED format shows horizontal offsets (at zoom >= 512) which are corrected in FULL PROJECTION format
JMars THEMIS Stamp layer hint:
- Observation --> Processing Stage --> D###
- use to return images that have DCS band combinations available to be rendered in JMars
- Observation --> Processing Stage --> DCS
- use to return images that have the 4-Panel-DCS images appropriate for viewing in the Mars Image Explorer
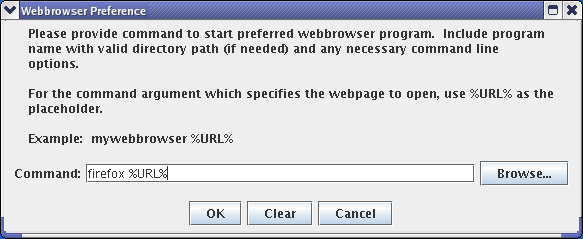
In the Stamp Layer focus panel, click on the settings tab and then click on the "Customize Webbrowser..." button. A web browser preferences window will open. Users can either enter the path to their preferred browser or use the "Browse" button to manually located their preferred browser. Once the web browser has been chosen, click "OK" to make the change.
Advanced
We have considered this, and understand how a web tool would improve accessibility. Unfortunately, after 25+ years of development, the code base for JMARS is very large and complex, and the ease of porting it to a new interface would be costly and time consuming. There are currently a number of ongoing NASA missions using the existing code, which requires that we continue to support it on the platforms it is on at the moment.
Listed are the radii (axis) values that JMARS currently uses for most injestions, conversions and custom map transformations.
Polar Radii (km):
- Mars = 3375.0
- Earth = 6356.7523142
- Luna = 1738.2
- Io = 1815.7
- Europa = 1559.5
- Ganymede = 2631.2
- Callisto = 2410.3
- Vesta = 229
- Vesta_iau = 229
- Ceres = 454.7
- Osiris = 0.250
- Itokawa = 0.346
- Eros = 8.420
- Phobos = 11.266
- Deimos = 6.200
- Dione = 559.6
- Mercury = 2439.700
- Venus = 6051.800
- Rhea = 762.4
- Enceladus = 252.100
- Mimas = 198.200
- Phoebe = 106.800
- Titan = 2576.000
- Tethys = 536.300
- Iapetus = 736.000
- Ariel = 577.7
- Miranda = 232.9
- Oberon = 761.400
- Umbriel = 584.700
- Titania = 788.900
- Triton = 1353.400
- Pluto = 1188.300
- Charon = 606.000
- Bennu = 0.250
- Psyche = 94.5
Equtorial Radii (km):
- Mars = 3397
- Earth = 6378.1370
- Luna = 1738.2
- Io = 1824.4
- Europa = 1561.5
- Ganymede = 2631.2
- Callisto = 2410.3
- Vesta = 284.5
- Vesta_iau = 284.5
- Ceres = 476.2
- Osiris = 0.250
- Itokawa = 0.346
- Eros = 8.420
- Phobos = 11.266
- Deimos = 6.200
- Dione = 562.4
- Mercury = 2439.700
- Venus = 6051.800
- Rhea = 764.1
- Enceladus = 252.100
- Mimas = 198.200
- Phoebe = 106.8
- Titan = 2576.000
- Tethys = 536.300
- Iapetus = 736.000
- Ariel = 581.1
- Miranda = 240.4
- Oberon = 761.400
- Umbriel = 584.700
- Titania = 788.900
- Triton = 1353.400
- Pluto = 1188.300
- Charon = 606.000
- Bennu = 0.250
- Psyche = 127.75
Starting JMARS manually
- To manually launch JMARS on a Linux machine, change to the directory containing the jmars.jar file (which you have already downloaded) and type:
> jmars - If you would like to open JMARS from a different directory, just replace "jmars.jar" with "path/jmars.jar".
Starting JMARS with additional arguments
The startup behavior of JMARS can be modified by including additional command-line arguments. (Note: Only one of these command-line arguments can be used at a time.)
- Specify the Starting Position
By default, JMARS starts with the viewing window centered at 0E, 0N. This starting location can be changed by adding latitude and longitude arguments to the jmars command.
> jmars Longitude Latitude
- Longitude - the value is assumed to be East longitude unless a "W" is used after the numerical value. (e.g., 120W)
- Latitude - the value is assumed to be North latitude unless a "S" is used after the numerical value. (e.g., 120S)
- Starting with Session Files
Session files allow users to restart JMARS in a previously saved configuration by specifying a startup file. See the Session Files page for more information.
> jmars path/session_file_name.jmars
Starting JMARS with flags
The startup behavior of JMARS can also be modified by including any of the following command line flags. Unlike the command-line arguments described above, multiple command-line flags can be used at one time, and they can be used in conjunction with command-line arguments.
- Clean: The "clean" flag will clear out the map tile cache before startup.
- Slideshow: The "slideshow" flag will enable the JMARS slideshow mode. See the Slideshow Mode page for more information
- Version: The "-version" flag (with lower case v) will list some information about the JMARS version being used. The "-Version" (with upper case V) flag will list much more detailed information about the JMARS version being used.
- Help: The "-help" flag will list the available command-line arguments and flags in the terminal window.
> jmars clean
> jmars slideshow
> jmars -version
> jmars -Version
> jmars -help
If you have additional problems with the Linux Installer, please contact the JMARS team.